
Table of Contents
- Setting up IIS
- Make your Site
- Configure the IIS Reverse Proxy
- Configure Server Variables
- Configure SSL Certificate
- Configuring User Authentication
Setting up IIS
To set up IIS, you will need to make a site and download some additional features.
- In Server Manager, go to Manage > Add Roles and Features.
- Select Role-based or feature-based installation, then click Next.
- Select the server from the server pool, then click Next.
- You should now be in Server Roles. Make sure you have URL Authorization and Windows Authentication checked.
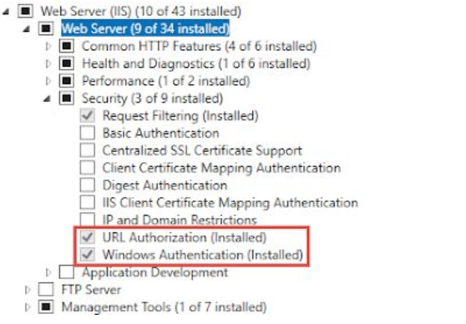
- Proceed through the remainder of the wizard.
- Download and install:
- URL Rewrite: https://www.iis.net/downloads/microsoft/url-rewrite
- Application Request Routing: https://www.iis.net/downloads/microsoft/application-request-routing
Make your Site
- Open IIS Manager.
- Right-click Sites and click Add Website.
- Give the site a name. Use the DefaultAppPool application pool.
- Give a physical path where the site will be located.
- For bindings:
Setting Value Type http(httpscan be used here, but you will need a certificate)IP address All Unassigned Port 80is the default; this can be changed if neededHost name Specify a host name - Now you have your site!
Configure the IIS Reverse Proxy
- Launch IIS Manager and select the website you'll be configuring as the reverse proxy. Click the URL Rewrite feature in the center panel.
- Click Add Rule(s)... in the Actions panel on the right.
- In the Add Rule(s) dialog, select Reverse Proxy and click OK.
- Click OK again.
- In the Add Reverse Proxy Rules dialog:
- Under Inbound Rules, enter the Kibana URL (
localhost:5601) as the location where requests will be forwarded. - Under Outbound Rules, enable Rewrite the domain names of the links in HTTP responses, and enter the external URL for the server in the To: field. The external URL is whatever clients on the network will type into their browsers to access Kibana. (The example uses the server name from a lab environment.)
- Click OK to complete the dialog.
Screenshot: Add Reverse Proxy Rules dialog with these values:
Field Value Inbound Rules – server name or IP localhost:5601Enable SSL Offloading Checked Rewrite the domain names of the links in HTTP responses Checked From localhost:5601To smb-elk1(example server name) - Under Inbound Rules, enter the Kibana URL (
Configure Server Variables
Inbound configuration
- With the website selected, go back to the URL Rewrite module. This time choose View Server Variables... from the Actions panel.
- On the Allowed Server Variables screen, choose Add... to add a new server variable called
HTTP_ACCEPT_ENCODING, then click OK. Follow the same process to add a second variable calledHTTP_X_ORIGINAL_ACCEPT_ENCODING. - Go back to the URL Rewrite rules and select the inbound rule (for example,
ReverseProxyInboundRule1). Then click Edit.... - On the Edit Inbound Rule screen, expand the Server Variables section and click Add....
- From the Server variable name drop-down, select
HTTP_X_ORIGINAL_ACCEPT_ENCODING. - Under Value, type
{HTTP_ACCEPT_ENCODING}. Be sure to include the curly braces so the rule knows to use the value of that variable. - Leave Replace the existing value checked, then click OK.
- From the Server variable name drop-down, select
- Click Add... again to add another server variable.
- This time select
HTTP_ACCEPT_ENCODINGfrom the drop-down. - Type any text value into the Value field (for example,
123).
Note: The goal is to set this variable's value to empty, but the field won't accept a blank value. Enter any placeholder text so the variable can be saved; it is replaced with a blank in step 7.
- This time select
- With both variables set, click Apply in the Actions panel.
- Replace the placeholder text value (
123in this example) with a blank. This is done in the website'sweb.configfile. For the Default Web Site, that file is located inC:\inetpub\wwwroot. Openweb.configin a text editor, find the text value you entered, and delete the value between the quotes, leaving just the quotes.Before:<rule name="ReverseProxyInboundRule1" stopProcessing="true">
<match url="(.*)" />
<action type="Rewrite" url="http://localhost:5601/{R:1}" />
<serverVariables>
<set name="HTTP_X_ORIGINAL_ACCEPT_ENCODING" value="{HTTP_ACCEPT_ENCODING}" />
<set name="HTTP_ACCEPT_ENCODING" value="123" />
</serverVariables>
</rule>After:
<rule name="ReverseProxyInboundRule1" stopProcessing="true">
    <match url="(.*)" />
    <action type="Rewrite" url="http://localhost:5601/{R:1}" />
    <serverVariables>
        <set name="HTTP_X_ORIGINAL_ACCEPT_ENCODING" value="{HTTP_ACCEPT_ENCODING}" />
        <set name="HTTP_ACCEPT_ENCODING" value="" />
    </serverVariables>
</rule> - In
web.config, also add the following after<configuration>and before<system.webServer>:<system.web>
<httpRuntime requestPathInvalidCharacters="" relaxedUrlToFileSystemMapping="true" />
</system.web>The top of the file should look like this:
<?xml version="1.0" encoding="UTF-8"?>
<configuration>
<system.web>
    <httpRuntime requestPathInvalidCharacters="" relaxedUrlToFileSystemMapping="true" />
</system.web>
<system.webServer> - Save the file.
Outbound configuration
That addresses the inbound portion of the configuration. Next, address outbound traffic.
- Under URL Rewrite, click Add Rule(s)... again, this time selecting Blank rule under Outbound rules.
- Name the new rule
RestoreAcceptEncoding, and select <Create New Precondition...> from the drop-down menu. On the Add Precondition screen:- Name:
NeedsRestoringAcceptEncoding - Using: Regular Expressions
- Logical grouping: Match All
- Name:
- Click Add... to add a new condition:
- Condition input:
{HTTP_X_ORIGINAL_ACCEPT_ENCODING}(include the curly braces) - Check if input string: Matches the Pattern
- Pattern:
.+ - Ignore case: Checked
- Condition input:
- Still on the Edit Outbound Rule screen, find the Match section and set:
- Matching scope: Server Variable
- Variable name:
HTTP_ACCEPT_ENCODING - Variable value: Matches the Pattern
- Using: Regular Expressions
- Pattern:
^(.*) - Ignore case: Checked
- Lastly, under the Action section:
- Ensure Action type is set to Rewrite.
- For Value, type
{HTTP_X_ORIGINAL_ACCEPT_ENCODING}(include the curly braces). - Ensure Replace existing server variable value is checked.
- Leave Stop processing of subsequent rules unchecked.
- Click Apply.
If everything has gone according to plan, reverse proxying from IIS to Kibana should now be working. If you browse to http://localhost on the Elastic server, you should see Kibana being served via IIS over port 80.
Configure SSL Certificate
- Select the server name in the left-hand Connections panel, then choose the Server Certificates option.
- Choose Create Self-Signed Certificate... from the Actions pane.
- Type the friendly name you want to use for referencing this certificate (the example uses the server name,
SMB-ELK1). Leave the certificate store set to Personal. Click OK. - With the certificate created, bind it to the website. To do that, expand the server in IIS and select the website (for example, Default Web Site).
- Select Bindings... from the Actions pane.
- On the Site Bindings screen, choose Add....
- On the Add Site Binding screen:
- Type:
https - IP address: All Unassigned
- Port:
443 - SSL certificate: select your certificate from the drop-down
- Type:
- Click OK to add the site binding, then click Close to close the Site Bindings screen. The website is now accessible over HTTPS.
Configuring User Authentication
- Back on the Dashboards server in IIS, select the website and choose the Authentication option.
- Within Authentication, set:
Name Status Anonymous Authentication Disabled Windows Authentication Enabled - Return to the main IIS screen for the website and select Authorization Rules.
- Delete the Allow → All Users rule that is created by default. Then click Add Allow Rule... in the Actions pane.
- In the Add Allow Authorization Rule dialog, select the Specified roles or user groups radio button and type the name of the group you're allowing access to (for example,
SMBLAB\Role-G-ElasticAdmins). Then click OK.