
By integrating with Microsoft Azure, the Shinydocs Pro software can operate with Microsoft SharePoint Online and/or Exchange Online — maintaining secure and compliant access to this cloud application with policy-based access controls.
The following document describes how to enable Azure authentication for Microsoft SharePoint Online.
Note that this process does require certificates, which are used by Azure to prove the Shinydocs application’s identity when requesting a token. You need two files, a .cer file with the public key which you upload to Azure, and a .pfx file with the private key that you add to the Shinydocs software.
These files are often provided by an organization’s IT or Network team.
A self-signed certificate can be used but is not advised depending on your organization’s infrastructure and security policies.
For the Microsoft PowerShell script to create a self-signed certificate, please visit https://learn.microsoft.com/en-us/sharepoint/dev/solution-guidance/security-apponly-azuread
Table of Contents
Requirements
Internet access to reach Microsoft Online
If the server cannot have direct internet access, ensure firewall rules are setup to allow HTTPS traffic to the following on port 443:
Azure/Entra permission to create application registrations and grant admin consent
A certificate used to authenticate (Azure requires the .cer and Shinydocs Pro requires the .pfx)
Create the self signed certificate for Azure
If you already have a process internally for creating these certificates, please follow your organizations best practices. If not, you can use the script below.
PowerShell script for certificate generation
This script is from Microsoft (https://learn.microsoft.com/en-us/sharepoint/dev/solution-guidance/security-apponly-azuread)
Save this script in notepad as GenerateCertificate.ps1
#Requires -RunAsAdministrator <# .SYNOPSIS Creates a Self Signed Certificate for use in server to server authentication .DESCRIPTION .EXAMPLE .\Create-SelfSignedCertificate.ps1 -CommonName "MyCert" -StartDate 2015-11-21 -EndDate 2017-11-21 This will create a new self signed certificate with the common name "CN=MyCert". During creation you will be asked to provide a password to protect the private key. .EXAMPLE .\Create-SelfSignedCertificate.ps1 -CommonName "MyCert" -StartDate 2015-11-21 -EndDate 2017-11-21 -Password (ConvertTo-SecureString -String "MyPassword" -AsPlainText -Force) This will create a new self signed certificate with the common name "CN=MyCert". The password as specified in the Password parameter will be used to protect the private key .EXAMPLE .\Create-SelfSignedCertificate.ps1 -CommonName "MyCert" -StartDate 2015-11-21 -EndDate 2017-11-21 -Force This will create a new self signed certificate with the common name "CN=MyCert". During creation you will be asked to provide a password to protect the private key. If there is already a certificate with the common name you specified, it will be removed first. #> Param( [Parameter(Mandatory=$true)] [string]$CommonName, [Parameter(Mandatory=$true)] [DateTime]$StartDate, [Parameter(Mandatory=$true)] [DateTime]$EndDate, [Parameter(Mandatory=$false, HelpMessage="Will overwrite existing certificates")] [Switch]$Force, [Parameter(Mandatory=$false)] [SecureString]$Password ) # DO NOT MODIFY BELOW function CreateSelfSignedCertificate(){ #Remove and existing certificates with the same common name from personal and root stores #Need to be very wary of this as could break something if($CommonName.ToLower().StartsWith("cn=")) { # Remove CN from common name $CommonName = $CommonName.Substring(3) } $certs = Get-ChildItem -Path Cert:\LocalMachine\my | Where-Object{$_.Subject -eq "CN=$CommonName"} if($certs -ne $null -and $certs.Length -gt 0) { if($Force) { foreach($c in $certs) { remove-item $c.PSPath } } else { Write-Host -ForegroundColor Red "One or more certificates with the same common name (CN=$CommonName) are already located in the local certificate store. Use -Force to remove them"; return $false } } $name = new-object -com "X509Enrollment.CX500DistinguishedName.1" $name.Encode("CN=$CommonName", 0) $key = new-object -com "X509Enrollment.CX509PrivateKey.1" $key.ProviderName = "Microsoft RSA SChannel Cryptographic Provider" $key.KeySpec = 1 $key.Length = 2048 $key.SecurityDescriptor = "D:PAI(A;;0xd01f01ff;;;SY)(A;;0xd01f01ff;;;BA)(A;;0x80120089;;;NS)" $key.MachineContext = 1 $key.ExportPolicy = 1 # This is required to allow the private key to be exported $key.Create() $serverauthoid = new-object -com "X509Enrollment.CObjectId.1" $serverauthoid.InitializeFromValue("1.3.6.1.5.5.7.3.1") # Server Authentication $ekuoids = new-object -com "X509Enrollment.CObjectIds.1" $ekuoids.add($serverauthoid) $ekuext = new-object -com "X509Enrollment.CX509ExtensionEnhancedKeyUsage.1" $ekuext.InitializeEncode($ekuoids) $cert = new-object -com "X509Enrollment.CX509CertificateRequestCertificate.1" $cert.InitializeFromPrivateKey(2, $key, "") $cert.Subject = $name $cert.Issuer = $cert.Subject $cert.NotBefore = $StartDate $cert.NotAfter = $EndDate $cert.X509Extensions.Add($ekuext) $cert.Encode() $enrollment = new-object -com "X509Enrollment.CX509Enrollment.1" $enrollment.InitializeFromRequest($cert) $certdata = $enrollment.CreateRequest(0) $enrollment.InstallResponse(2, $certdata, 0, "") return $true } function ExportPFXFile() { if($CommonName.ToLower().StartsWith("cn=")) { # Remove CN from common name $CommonName = $CommonName.Substring(3) } if($Password -eq $null) { $Password = Read-Host -Prompt "Enter Password to protect private key" -AsSecureString } $cert = Get-ChildItem -Path Cert:\LocalMachine\my | where-object{$_.Subject -eq "CN=$CommonName"} Export-PfxCertificate -Cert $cert -Password $Password -FilePath "$($CommonName).pfx" Export-Certificate -Cert $cert -Type CERT -FilePath "$CommonName.cer" } function RemoveCertsFromStore() { # Once the certificates have been been exported we can safely remove them from the store if($CommonName.ToLower().StartsWith("cn=")) { # Remove CN from common name $CommonName = $CommonName.Substring(3) } $certs = Get-ChildItem -Path Cert:\LocalMachine\my | Where-Object{$_.Subject -eq "CN=$CommonName"} foreach($c in $certs) { remove-item $c.PSPath } } if(CreateSelfSignedCertificate) { ExportPFXFile RemoveCertsFromStore } Run the script:
Open PowerShell as administrator.
Navigate to the directory you saved the script to. (
cd)Run the script by entering .\GenerateCertificate.ps1
Follow the prompts in the console to generate the certificate for Azure
Register Shinydocs Software with Azure
The first step of the process is to register your Shinydocs software with Azure, so that it can access SharePoint Online or Exchange Online data.
You only need to register one application for Shinydocs software. Permissions to supported repositories can be configured the one registration.
Open Microsoft Azure.
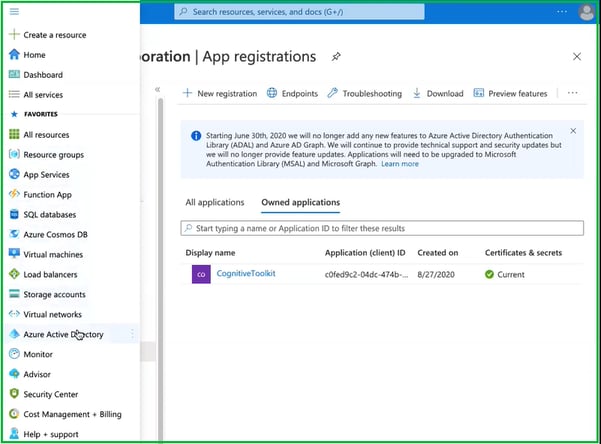
In the upper left corner dropdown menu, navigate to Azure Active Directory.
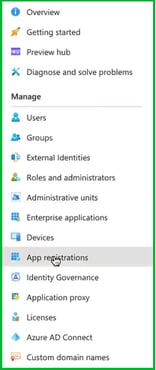
From the sidebar menu, select App registrations
Select + New registration

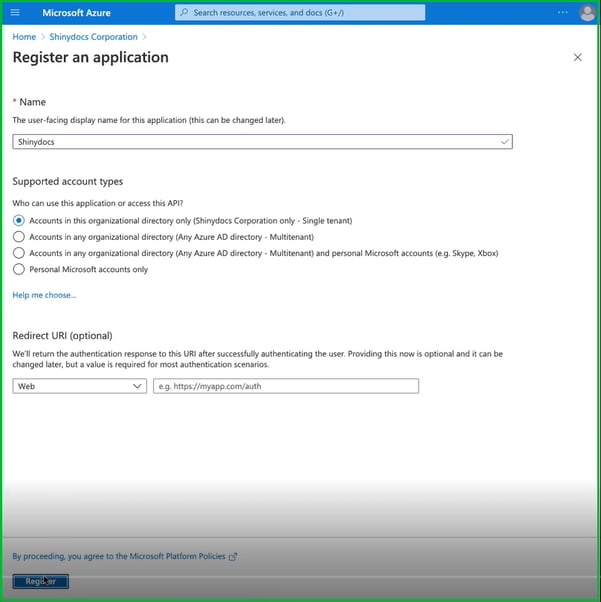
Enter a name for the application. In this case, we used “Shinydocs Pro” as the application name.
Select who, within your organization, can use or access the application. In most cases, the first option (Single tenant) will be selected (see below).
The optional Redirect URl is not needed in this case.
Select Register to continue.
Upload Authentication Certificate to Azure
These steps require a .cer file.
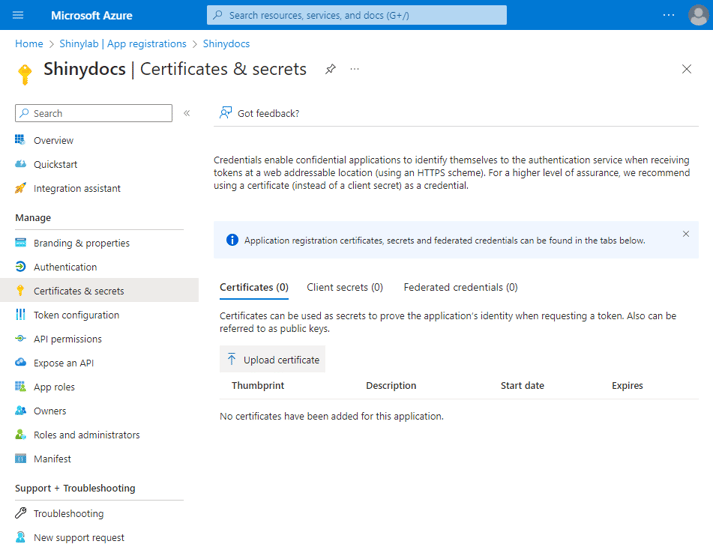
From the sidebar menu, select Certificates & secrets
Select Certificates
Select Upload certificate
Select the folder icon to browse for your certificate (.cer). Optionally, add a description to let other administrators know what this certificate is used for.
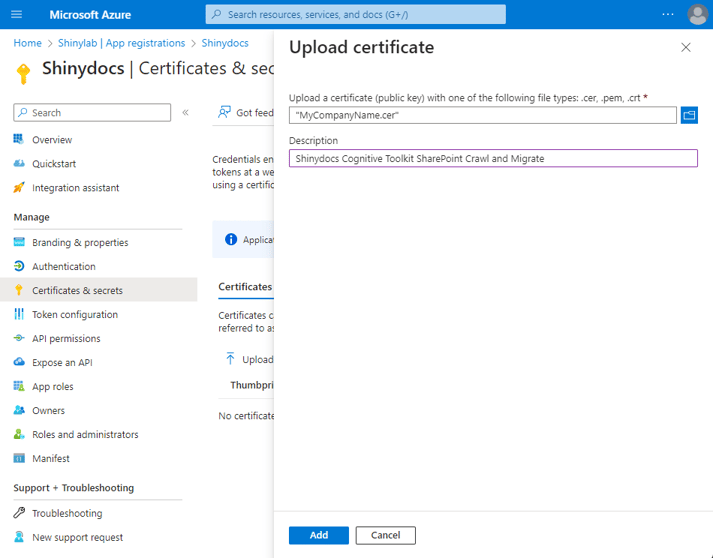
Select Add
Verify that the certificate was uploaded successfully by confirming the certificate is shown Certificates
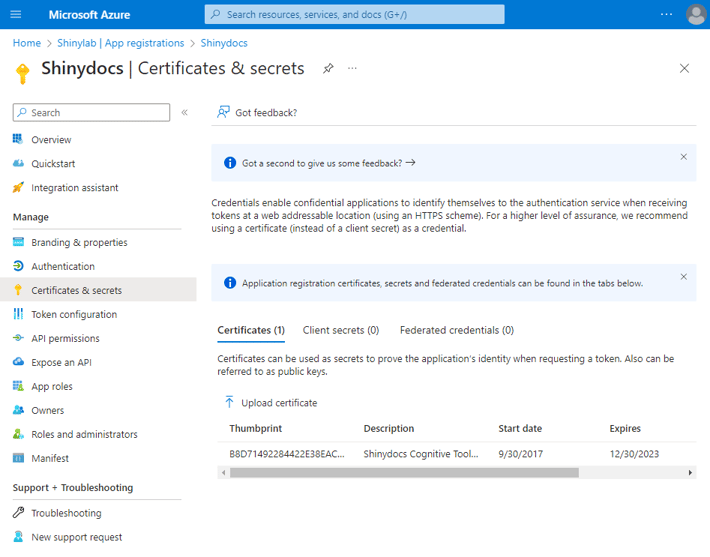
Still in Certificates & secrets, click the Client secrets tab.
Click + New client secret
In the Add a client secret panel, add a description of your choice
Set it to expire in 12 months or longer.
This is a good time to schedule a reminder for the expiry, as Shinydocs Pro will also need the new secret key when this one expires.Click Add.
Copy the secret key to a safe location, as you will not be able to retrieve it later.
In the left-hand menu, open Overview
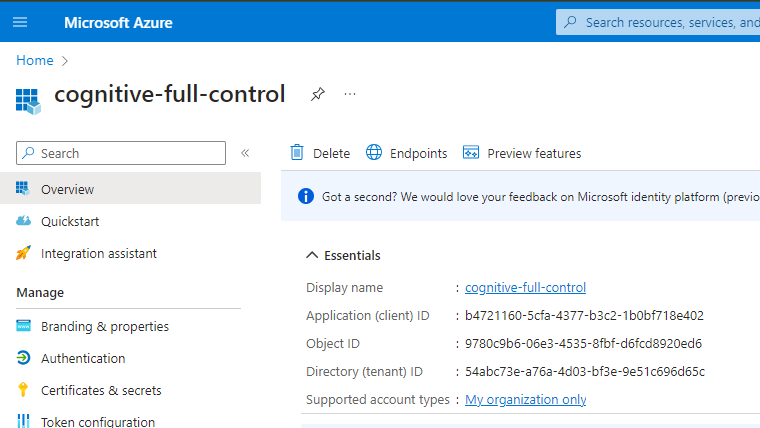
Note/save the following information for configuring Shinydocs Pro in later steps.
- Application (client) ID: ___________________________________________________
- Directory (tenant) ID: ___________________________________________________
- Secret key: ___________________________________________________
Authentication
Still in the Azure portal Shinydocs application registration, now you will set up the redirect URIs for authentication.
Navigate to the Authentication tab in the application registration
Web > Redirect URIs
This set up will be for the server running Shinydocs Pro Search using it’s hostname. You can update these settings later when/if you set up your fully qualified domain name in your DNS.
Click Add URI, and add the following
https:///azuread/success e.g.
https://shinyvm/azuread/success
https:///api/v1/oidc/signin-callback e.g.
https://shinyvm/api/v1/oidc/signin-callback
https:///oauth/authorized e.g.
https://shinyvm/oauth/authorized
https://localhost:9701/azuread/successhttps://localhost:9701/api/v1/oidc/signin-callbackhttps://localhost:9701/oauth/authorized
Source-specific permissions
If you connect to more than one Microsoft content source, there will be overlapping permissions due to the design of SharePoint, Teams, etc.
Your Shinydocs Control Center app registration only needs one copy of the permission.
Permission to access SharePoint Online Content
Permissions for SharePoint Online Content
Now that the Shinydocs Application has been registered with Azure, it’s time to apply permissions to access content within SharePoint Online.
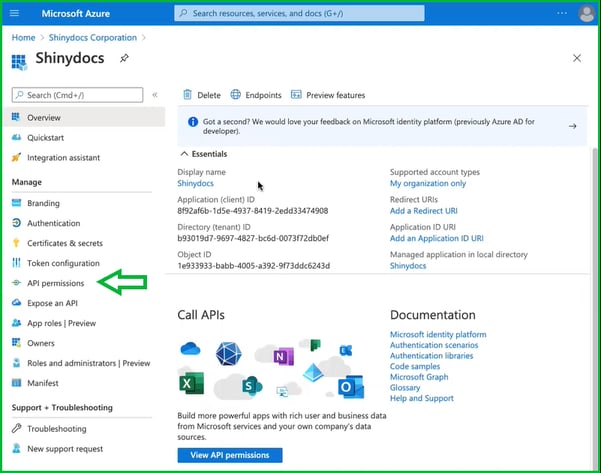
From the sidebar menu, select API permissions
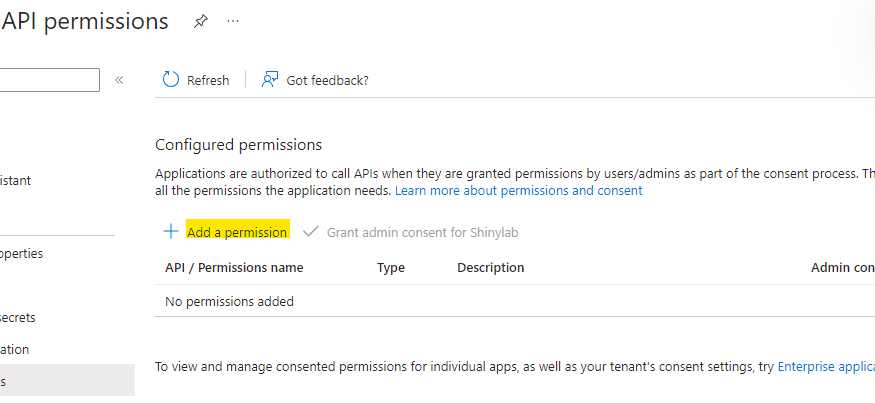
Select + Add a permission
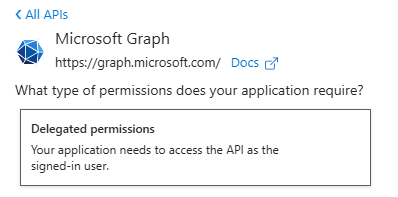
Select Microsoft Graph:

Then, select Delegated permissions
Add the following delegated permissions
User.Read
Type:Delegatedoffline_acccess
Type:Delegatedopenid
Type:Delegatedprofile
Type:Delegated
Click Add permissions
Back in API permissions page, click + Add a permission again. Select SharePoint:
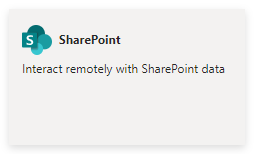
Then select Delegated permissions
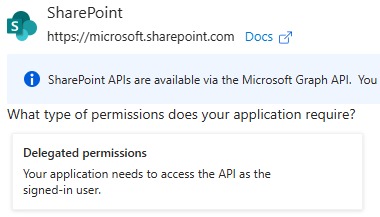
Add the following permission:
Allsites.Read
Type:Delegated
Click Add permissions
Now, we are going to set application level permission. Back in API permissions page, click + Add a permission again. Select SharePoint
Then, select Application permissions
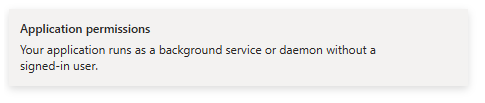
Add the following permission:
Sites.Read.All
Type:ApplicationNext, select Grant admin consent for [Tenant Name].
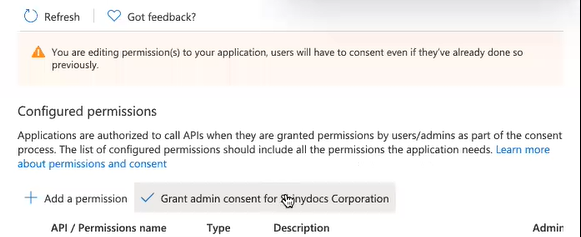
Select Yes to grant consent for the requested permissions for all accounts in [Directory Name].

At the top of the page, there will be a notification that admin consent for the requested permissions was successfully granted.
Using Sites.Selected instead of Sites.Read.All/AllSites.Read
Shinydocs recommends using Sites.Read.All(application) and AllSites.Read (delegation) for simplicity and completeness of scope. If you organization will not allow that level of API access, there is an alternative with Sites.Selected.
Your administrator must use the PowerShell PnP module (compatible only with PowerShell 7+) to connect and set permissions for Sites.Selected. Microsoft’s UI does not support this.
From the sidebar menu, select API permissions
Select + Add a permission
Select Microsoft Graph:
Then, select Delegated permissions
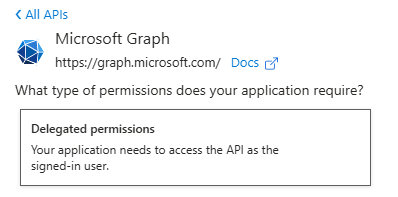
Add the following delegated permissions
User.Read
Type:Delegatedoffline_acccess
Type:Delegatedopenid
Type:Delegatedprofile
Type:DelegatedSites.Selected
Type:Delegated
Click Add permissions
Back in API permissions page, click + Add a permission again. Select SharePoint:
Then select Application permissions
Add the following permissions:
Sites.Selected
Type:ApplicationUser.Read.All
Type:Application
You will need to have an Admin grant Admin consent for
Sites.SelectedandUser.Read.All.Your permissions should look like this:
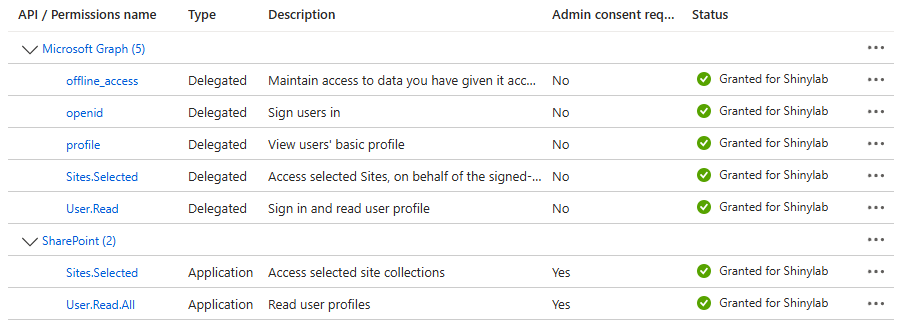
Once this is configured, your administrator will be able to grant
readorwrite(if you are planning on disposing of content with Shinydocs Pro) permission to this app registration. This must be done with PowerShell 7 and the PnP PowerShell module.
IMPORTANT:
Use of the PnP module requires that your administrator already has an app registration for PnP! You cannot connect with PnP without first having a separate app registration allowing PnP to make the required changes. Administrators who use PnP should already have this configured. If you do not, here is a quick way to create one:Create an application registration in Azure (you only need to provide it a name like
PnP PowerShell Admin, no certificates or secrets).Note the application client ID
Assign it the SharePoint
AllSites.FullControl(required to change site permissions)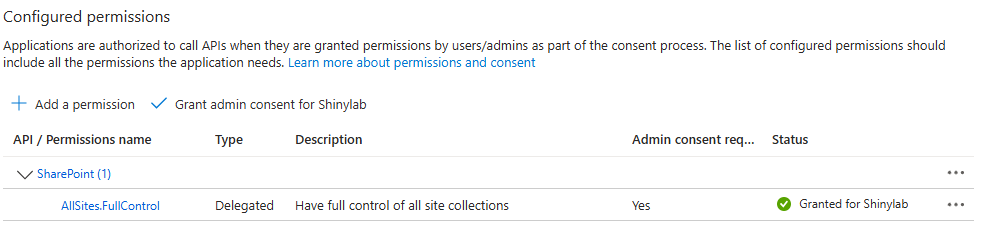
Grant admin consent for the changes made.
Now you can connect via PnP in PowerShell and set the permissions
Install the module if you do not have it already
Install-Module PnP.PowerShellThen import the module for use in your session
Import-Module PnP.PowerShellConnect your PowerShell session with PnPOnline
Connect-PnPOnline -Url "https://.sharepoint.com" -ClientId " Now you can assign the Shinydocs App registration to the specific site(s) you want with the level of permissions you want to give (read/write)Grant-PnPAzureADAppSitePermission -AppId "" -DisplayName "clandry-spo-selected-test" -Permissions -Site "https:// .sharepoint.com/sites/ " If no errors are displayed, the change is successful.
Permission to access Exchange Online
Permissions for Exchange Online
Now that the Shinydocs Application has been registered with Azure, it’s time to apply permissions to access content within Exchange Online.
From the sidebar menu, select API permissions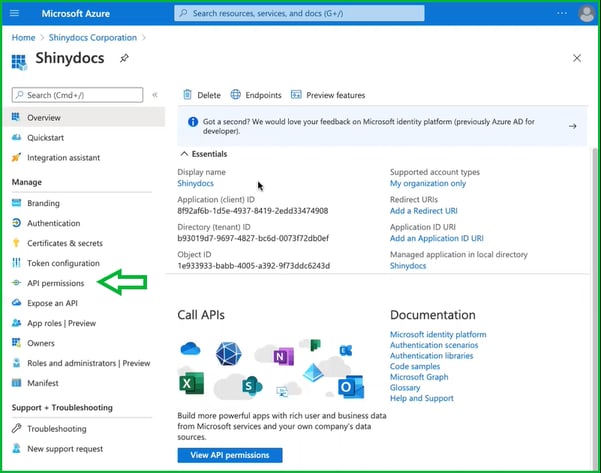
Select + Add a permission
Select Microsoft Graph:
Select Application permissions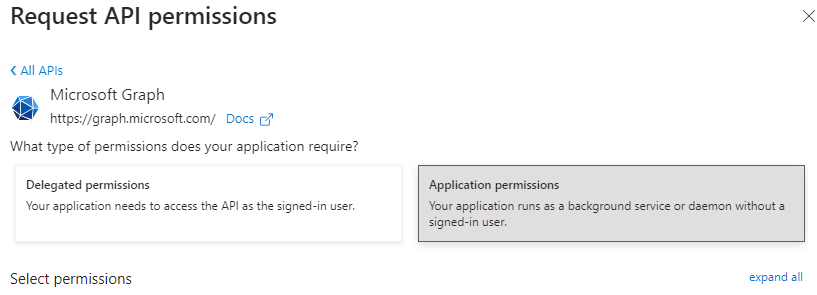
Add the following Application permissions:User.Read.All
Type:ApplicationMail.Read
Type:Application
Click Add permissions at the bottom of the page.The API permissions should now be updated to include Graph.
Click Add permissions again > Graph > Delegated
Add the following Delegated permissions:Directory.AccessAsUser.All
Type:Delegatedemail
Type:DelegatedEWS.AccessAsUser.All
Type:DelegatedFiles.Read.All
Type:DelegatedGroup.Read.All
Type:DelegatedMail.Read
Type:DelegatedMail.Read.Shared
Type:Delegatedoffline_access
Type:Delegatedopenid
Type:Delegatedprofile
Type:DelegatedUser.Read
Type:Delegated
Click Add permissions at the bottom of the page.Next, select Grant admin consent for [Tenant Name].
Select Yes to grant consent for the requested permissions for all accounts in [Directory Name].
At the top of the page, there will be a notification that admin consent for the requested permissions was successfully granted.
Permission to access Teams
Permissions for Teams
Now that the Shinydocs Application has been registered with Azure, it’s time to apply permissions to access content within Teams.
From the sidebar menu, select API permissions
Select + Add a permission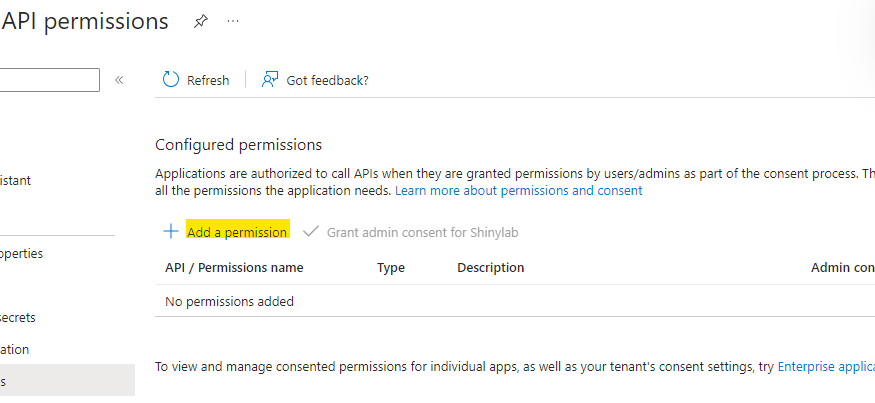
Select Microsoft Graph:
Select Application permissions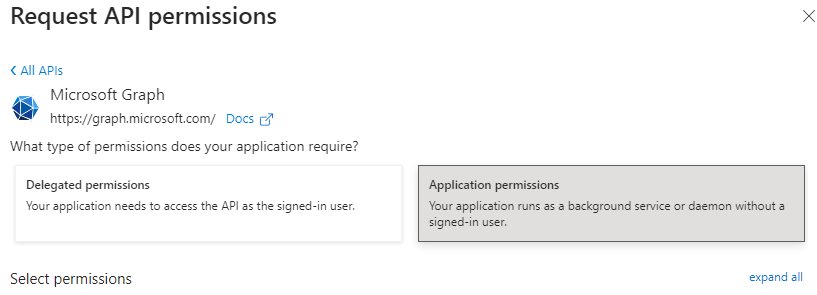
Add the following Application permissions:Channel.ReadBasic.All
Type:ApplicationChannelMember.Read.All
Type:ApplicationChannelMessage.Read.All
Type:ApplicationChannelSettings.Read.All
Type:ApplicationChat.Read.All
Type:ApplicationChat.ReadBasic.All
Type:ApplicationChatMessage.Read.All
Type:ApplicationFiles.Read.All
Type:ApplicationTeam.ReadBasic.All
Type:ApplicationUser.Read.All
Type:Application
Click Add permissions at the bottom of the page.Click + Add a permission again > Graph > DelegatedAdd the following Delegated permissions:offline_access
Type:Delegationopenid
Type:Delegationprofile
Type:DelegationUser.Read
Type:DelegationFiles.Read.All
Type:DelegationSites.Read.All
Type:DelegationDirectory.Read.All
Type:DelegationChannel.ReadBasic.All
Type:DelegationChannelMember.Read.All
Type:DelegationChat.Read
Type:DelegationGroup.Read.All
Type:DelegationTeam.ReadBasic.All
Type:DelegationTeamSettings.Read.All
Type:Delegation
Click Add permissions at the bottom of the page.Next, select Grant admin consent for [Tenant Name].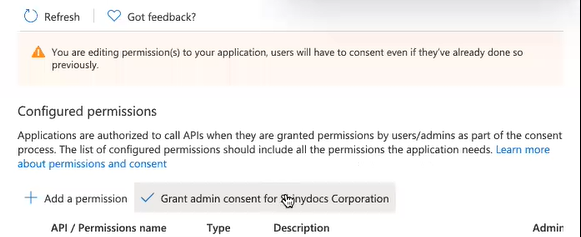
Select Yes to grant consent for the requested permissions for all accounts in [Directory Name].
At the top of the page, there will be a notification that admin consent for the requested permissions was successfully granted.
Permission to access OneDrive
Permission to access OneDrive
Now that the Shinydocs Application has been registered with Azure, it’s time to apply permissions to access content within OneDrive.
From the sidebar menu, select API permissions
Select + Add a permission
Select Microsoft Graph:
Select Application permissions
Add the following Application permissions:Files.Read.All
Type:ApplicationDirectory.Read.All
Type:Application
Click Add permissions at the bottom of the page.Click + Add a permission again > Graph > DelegatedAdd the following Delegated permissions:offline_access
Type:Delegationopenid
Type:Delegationprofile
Type:DelegationUser.Read
Type:DelegationFiles.Read.All
Type:DelegationDirectory.Read.All
Type:Delegation
Click Add permissions at the bottom of the pageNext, select Grant admin consent for [Tenant Name].
Select Yes to grant consent for the requested permissions for all accounts in [Directory Name].
At the top of the page, there will be a notification that admin consent for the requested permissions was successfully granted.
Configure Shinydocs Control Center
The following configurations are performed in the Shinydocs Control Center’s + Add source feature.
SharePoint Online
SharePoint Online
These steps can be followed once Shinydocs Pro has been installed.
 You will need the .pfx file from your certificate.
Moving the .pfx after setting the Certificate file location will cause any related tasks to fail.
If the .pfx file is moved, you will need to update the Certificate file location to the new path.
In Shinydocs Control Center (either in quick-start or + Add source):
Select Microsoft SharePoint Online as your new or existing source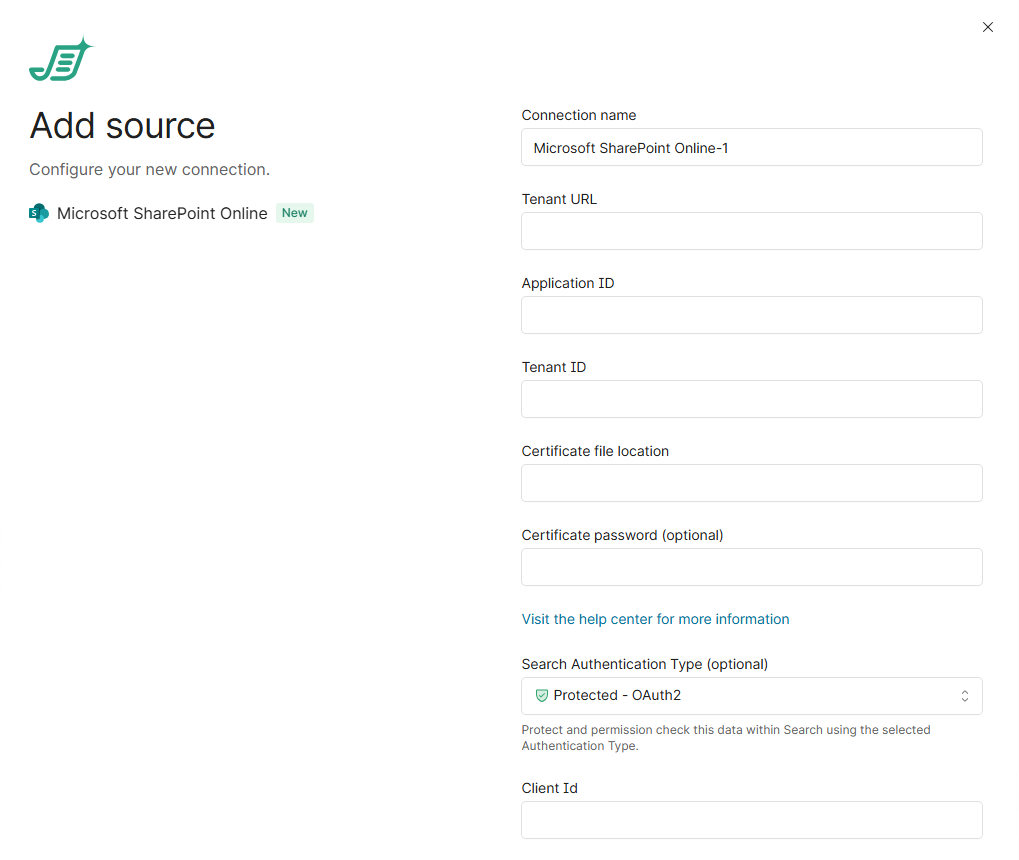
Tenant URL: enter the root URL of the Sharepoint site (https://acmecorp.sharepoint.com/)Application ID: enter the Application (client) ID previously notedTenant ID: enter the Directory (tenant) ID previously notedCertificate file location: enter the path of the .pfx fileDo not use double quotes around the path
Certificate password: enter the password for the .pfx file. If your .pfx file does not have a password, leave this field blankSearch Authentication Type: select Protected - OAuth2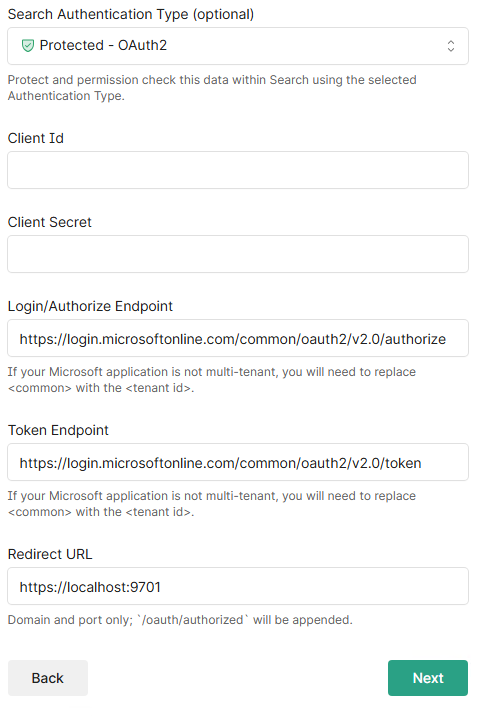
Enter the Client ID from your application registrationEnter the Client Secret (key) from your application registrationFor Login/Authorize Endpoint, replace “common” with your Tenant IDe.g.https://login.microsoftonline.com/42abc123-a76a-4j03-bf1e-4e51c696d65d/oauth2/v2.0/authorize
For Token Endpoint, replace “common” with your Tenant IDe.g.https://login.microsoftonline.com/42abc123-a76a-4j03-bf1e-4e51c696d65d/oauth2/v2.0/token
Click Next. A validation check is performed to make sure the information entered is correct. If an error occurs, the error should indicate the issue at hand.Site, if you want to crawl specific sites, enter the URL for the site like this:https://acmecorp.sharepoint.com/sites/ACMEhomeOtherwise leave it blank to analyze all sites.
More options
In Shinydocs Pro 26.1+, administrators can now by default select which analysis tools will run on the source.
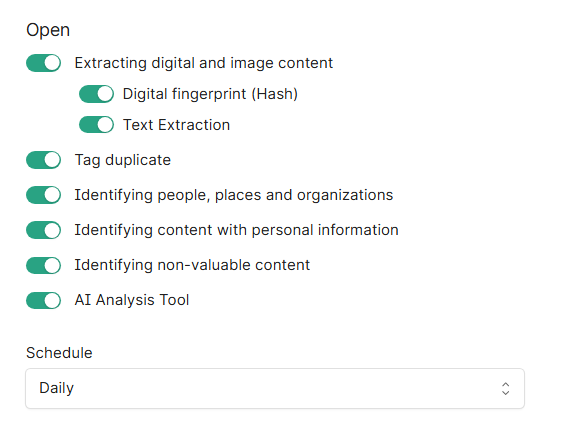
Extracting digital and image content reads file contents, including images, for analysis.Digital fingerprint (Hash): creates a unique identifier for each file to detect exact duplicates.Text Extraction: extracts readable text from documents for searching and analysis (includes OCR).
Tag duplicate: marks files as duplicates based on their digital fingerprint across all Shinydocs Pro sources.Identifying people, places and organizations: detects mentions of people, locations, and organizations within document content.Identifying content with personal information: scans for personally identifiable information like names, addresses, and social insurance/security numbers (PII).Identifying non-valuable content: flags redundant, obsolete, or trivial (ROT) content to identify cleanup candidates.AI Analysis Tool (license dependent, requires setup before use): employs AI for deeper content classification beyond rules.Schedule: controls how often analysis tasks run. "Daily" runs them once per day.
Click Start Analysis
Congratulations! You should now be crawling your organization’s SharePoint content.
Exchange Online
Exchange Online
These steps can be followed once Shinydocs Pro has been installed.
 You will need the .pfx file from your certificate.
Moving the .pfx after setting the Certificate file location will cause any related tasks to fail.
If the .pfx file is moved, you will need to update the Certificate file location to the new path.
In Shinydocs Control Center (either in quick-start or + Add source):
Select Microsoft Exchange Online as your new or existing source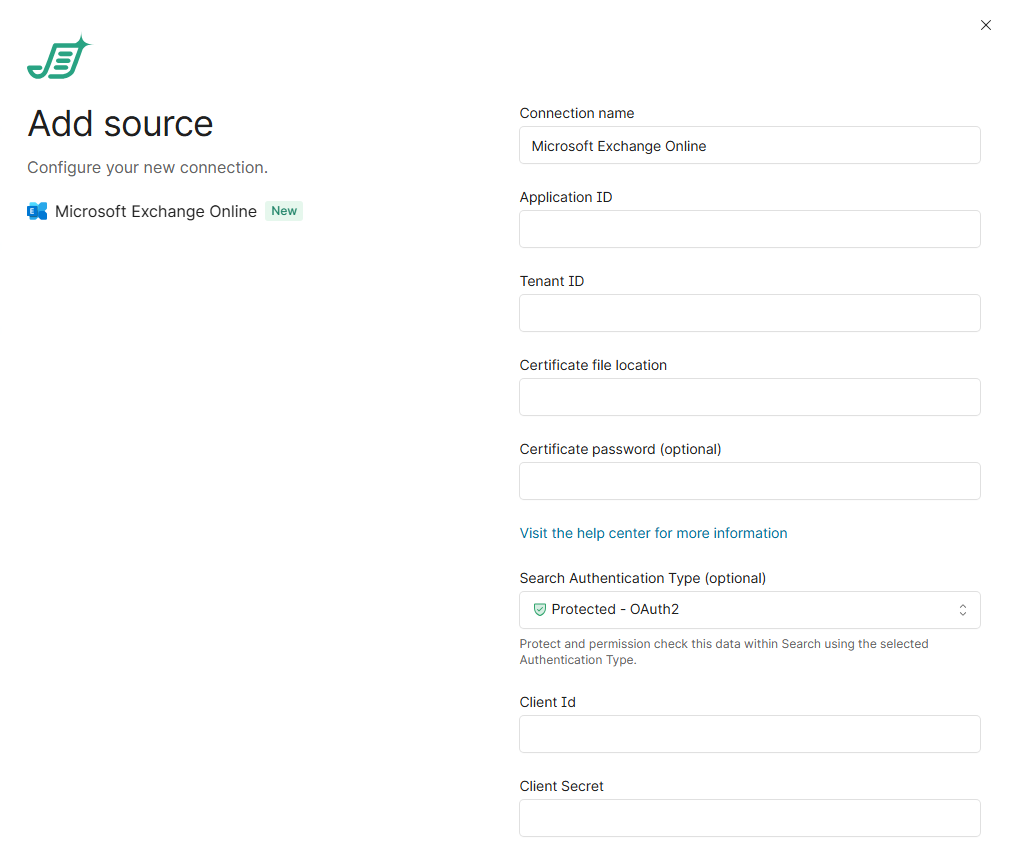
Application ID: enter the Application (client) ID previously notedTenant ID: enter the Directory (tenant) ID previously notedCertificate file location: enter the path of the .pfx fileDo not use double quotes around the path
Certificate password: enter the password for the .pfx file. If your .pfx file does not have a password, leave this field blankSearch Authentication Type, select Protected - OAuth2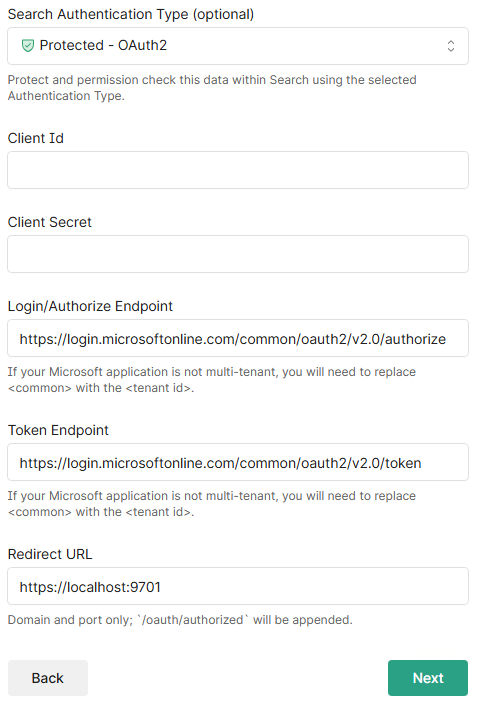
Enter the Client ID from your application registrationEnter the Client Secret (key) from your application registrationFor Login/Authorize Endpoint, replace “common” with your Tenant IDe.g.https://login.microsoftonline.com/42abc123-a76a-4j03-bf1e-4e51c696d65d/oauth2/v2.0/authorize
For Token Endpoint, replace “common” with your Tenant IDe.g.https://login.microsoftonline.com/42abc123-a76a-4j03-bf1e-4e51c696d65d/oauth2/v2.0/token
Click Next. A validation check is performed to make sure the information entered is correct. If an error occurs, the error should indicate the issue at hand.Email addresses, if you want to crawl a specific account(s), enter the email addresses like this:sketchum@shinydocs.comOtherwise leave it blank to analyze all accounts.
More options
In Shinydocs Pro 26.1+, administrators can now by default select which analysis tools will run on the source.
Extracting digital and image content reads file contents, including images, for analysis.Digital fingerprint (Hash): creates a unique identifier for each file to detect exact duplicates.Text Extraction: extracts readable text from documents for searching and analysis (includes OCR).
Tag duplicate: marks files as duplicates based on their digital fingerprint across all Shinydocs Pro sources.Identifying people, places and organizations: detects mentions of people, locations, and organizations within document content.Identifying content with personal information: scans for personally identifiable information like names, addresses, and social insurance/security numbers (PII).Identifying non-valuable content: flags redundant, obsolete, or trivial (ROT) content to identify cleanup candidates.AI Analysis Tool (license dependent, requires setup before use): employs AI for deeper content classification beyond rules.Schedule: controls how often analysis tasks run. "Daily" runs them once per day.
Click Start Analysis
Congratulations! You should now be crawling your organization’s Exchange email content
Teams
Teams
When crawling a specific user(s), only the users Direct Messages (DMs) will be analyzed. For a complete analysis, leave the user field empty.
These steps can be followed once Shinydocs Pro has been installed.
 You will need the .pfx file from your certificate.
Moving the .pfx after setting the Certificate file location will cause any related tasks to fail.
If the .pfx file is moved, you will need to update the Certificate file location to the new path.
In Shinydocs Control Center (either in quick-start or + Add source):
Select Microsoft Teams as your new or existing source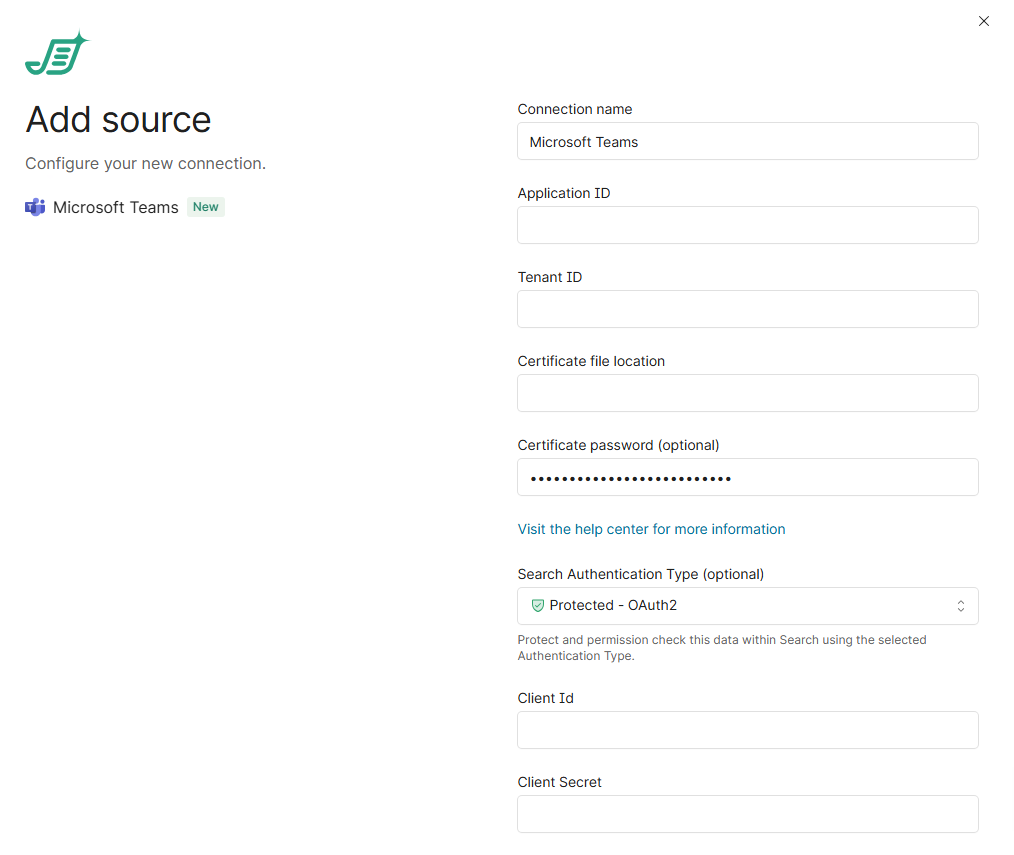
Application ID: enter the Application (client) ID previously notedTenant ID: enter the Directory (tenant) ID previously notedCertificate file location: enter the path of the .pfx fileDo not use double quotes around the path
Certificate password: enter the password for the .pfx file. If your .pfx file does not have a password, leave this field blankSearch Authentication Type: select Protected - OAuth2
Enter the Client ID from your application registrationEnter the Client Secret (key) from your application registrationFor Login/Authorize Endpoint, replace “common” with your Tenant IDe.g.https://login.microsoftonline.com/42abc123-a76a-4j03-bf1e-4e51c696d65d/oauth2/v2.0/authorize
For Token Endpoint, replace “common” with your Tenant IDe.g.https://login.microsoftonline.com/42abc123-a76a-4j03-bf1e-4e51c696d65d/oauth2/v2.0/token
Click Next. A validation check is performed to make sure the information entered is correct. If an error occurs, the error should indicate the issue at hand.User Ids or Teams Ids, if you want to crawl a specific account(s), enter the email address like this:sketchum@shinydocs.comOtherwise leave it blank to analyze all accounts.
More options
In Shinydocs Pro 26.1+, administrators can now by default select which analysis tools will run on the source.
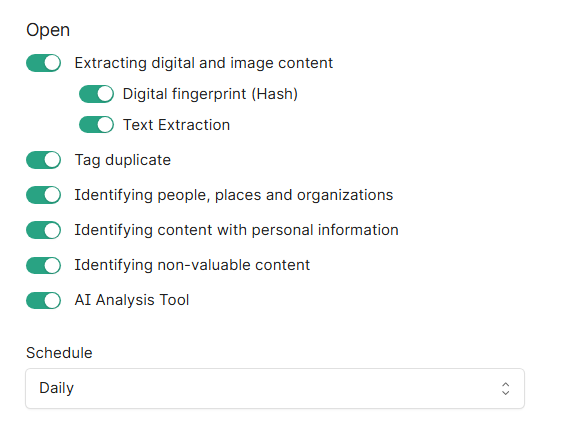
Extracting digital and image content reads file contents, including images, for analysis.Digital fingerprint (Hash): creates a unique identifier for each file to detect exact duplicates.Text Extraction: extracts readable text from documents for searching and analysis (includes OCR).
Tag duplicate: marks files as duplicates based on their digital fingerprint across all Shinydocs Pro sources.Identifying people, places and organizations: detects mentions of people, locations, and organizations within document content.Identifying content with personal information: scans for personally identifiable information like names, addresses, and social insurance/security numbers (PII).Identifying non-valuable content: flags redundant, obsolete, or trivial (ROT) content to identify cleanup candidates.AI Analysis Tool (license dependent, requires setup before use): employs AI for deeper content classification beyond rules.Schedule: controls how often analysis tasks run. "Daily" runs them once per day.
Click Start Analysis
Congratulations! You should now be crawling your organization’s Microsoft Teams content
OneDrive
OneDrive
These steps can be followed once Shinydocs Pro has been installed.
 You will need the .pfx file from your certificate.
Moving the .pfx after setting the Certificate file location will cause any related tasks to fail.
If the .pfx file is moved, you will need to update the Certificate file location to the new path.
In Shinydocs Control Center (either in quick-start or + Add source):
Select Microsoft OneDrive as your new or existing source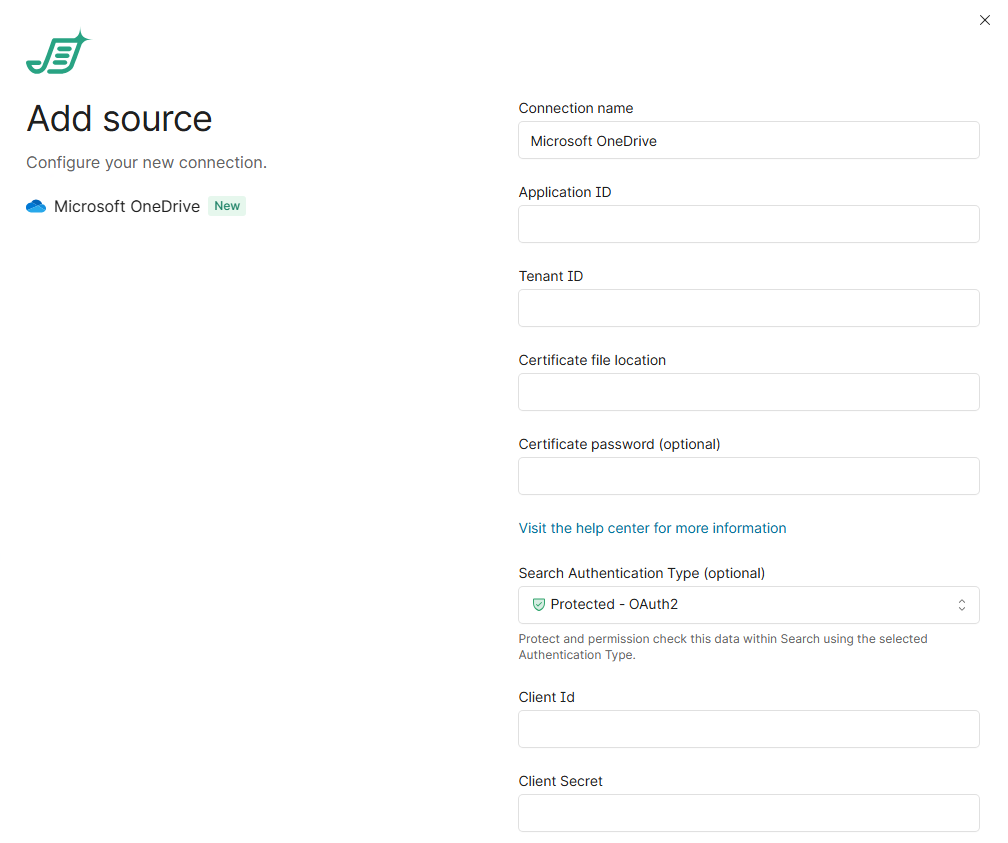
Application ID: enter the Application (client) ID previously notedTenant ID: enter the Directory (tenant) ID previously notedCertificate file location: enter the path of the .pfx fileDo not use double quotes around the path
Certificate password: enter the password for the .pfx file. If your .pfx file does not have a password, leave this field blankSearch Authentication Type: select Protected - OAuth2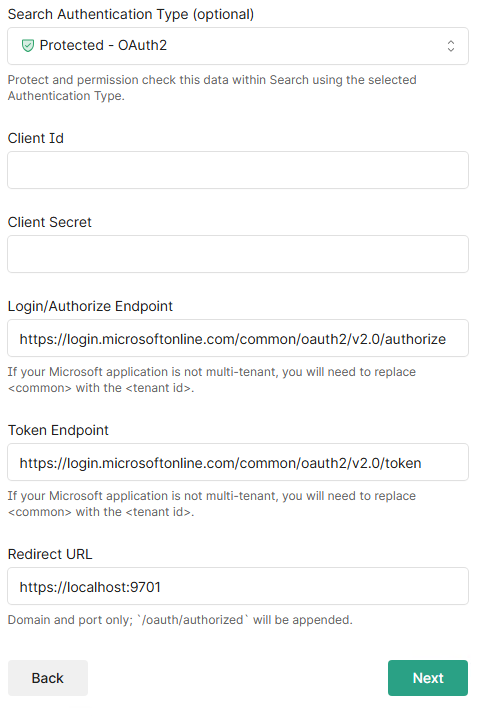
Enter the Client ID from your application registrationEnter the Client Secret (key) from your application registrationFor Login/Authorize Endpoint, replace “common” with your Tenant IDe.g.https://login.microsoftonline.com/42abc123-a76a-4j03-bf1e-4e51c696d65d/oauth2/v2.0/authorize
For Token Endpoint, replace “common” with your Tenant IDe.g.https://login.microsoftonline.com/42abc123-a76a-4j03-bf1e-4e51c696d65d/oauth2/v2.0/token
Click Next. A validation check is performed to make sure the information entered is correct. If an error occurs, the error should indicate the issue at hand.User Id, if you want to crawl a specific account(s), enter the email address like this:sketchum@shinydocs.comOtherwise leave it blank to analyze all accounts.
More options
In Shinydocs Pro 26.1+, administrators can now by default select which analysis tools will run on the source.
Extracting digital and image content reads file contents, including images, for analysis.Digital fingerprint (Hash): creates a unique identifier for each file to detect exact duplicates.Text Extraction: extracts readable text from documents for searching and analysis (includes OCR).
Tag duplicate: marks files as duplicates based on their digital fingerprint across all Shinydocs Pro sources.Identifying people, places and organizations: detects mentions of people, locations, and organizations within document content.Identifying content with personal information: scans for personally identifiable information like names, addresses, and social insurance/security numbers (PII).Identifying non-valuable content: flags redundant, obsolete, or trivial (ROT) content to identify cleanup candidates.AI Analysis Tool (license dependent, requires setup before use): employs AI for deeper content classification beyond rules.Schedule: controls how often analysis tasks run. "Daily" runs them once per day.
Click Start Analysis
Congratulations! You should now be crawling your organization’s Microsoft OneDrive content.