
Ollama is your local AI engine for running fast, private language models - no cloud required. Shinydocs Pro integrates with Ollama to power document enrichment, data extraction, and intelligent tagging, all behind your firewall.
This guide walks you through installing Ollama, binding it to 0.0.0.0 so Shinydocs Pro can connect, and setting up GPU drivers to get the most out of your hardware.
For more detailed information about installing Ollama on your operating system, check out Ollama’s official documentation:
Graphics Processing Unit (GPU) Drivers
For best performance, make sure your system has the latest NVIDIA or AMD drivers installed. Failing to do so may result in Ollama using only your CPU and RAM (very slow).
To confirm your GPU is supported by Ollama, check the official compatibility list here: https://docs.ollama.com/gpu
If your card is listed and drivers are up to date, Ollama will automatically take advantage of your GPU when available.
For the latest NVIDIA drivers, check out: https://www.nvidia.com/en-us/drivers/
For the latest AMD drivers, check out: Drivers and Support for Processors and Graphics
Sizing models based on your resources
There’s no exact formula for matching hardware to LLM performance. In general, smaller models are faster but less accurate, and larger models are slower but more capable. The key is finding the sweet spot between speed, cost, and the level of insight you need.
General guide for VRAM
Use this as a starting point when deciding which models your hardware can realistically handle:
Additional Notes
~1 GB of VRAM per billion parameters is a rough baseline.
Actual memory use varies based on model type, quantization, and input length.
Using quantized models (like
:q4_K_M) significantly lowers VRAM demands.Always test with a small set of documents first to find what works best on your setup.
The goal isn’t just “bigger is better”, it’s about choosing the model that gets good enough answers fast enough for your workflow.
Windows
Install Ollama
Download the installer: Download Ollama on Windows
By default, Ollama will install to the active user’s profile directory. You can change this by launching OllamaSetup.exe in CMD with an additional argument:
ChangeD:\Ollamato where your desired install location-
OllamaSetup.exe /DIR="D:\Ollama"
-
Run the installer and complete the setup
Shinydocs recommends running Ollama as a service via NSSM - the Non-Sucking Service Manager. Shinydocs Pro already comes with the NSSM executable in the Shinydocs Extraction Service (
[install_location]\Shinydocs Professional\ExtractionService\nssm.exe). You can copy this executable to your Ollama server or download it from NSSM. To configure this:Open CMD as Administrator
cdto the directory where nssm.exe has been placed
e.g.cd D:\NSSMRun
nssm.exe installThis will open the GUI to configure the service, input the following information
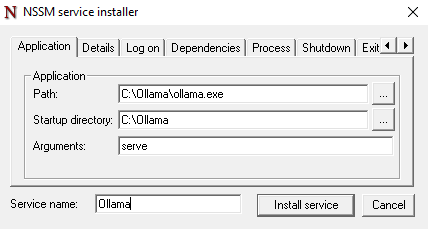
Application tab
Path: Click the … and browse for ollama.exe (notollama app.exe)
Startup directory: Auto-populates based on the Path
Arguments:serve
Service name: Ollama (or a name of your choice)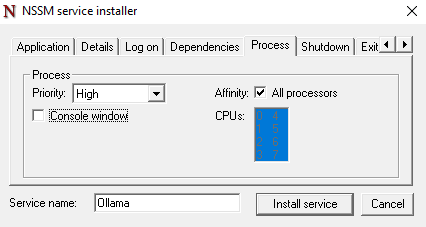
Process tab
Priority: High
Console window: uncheckedClick Install service
Open the Services window, you will now have an Ollama service (or whatever you named the service in previous steps). Start it now:
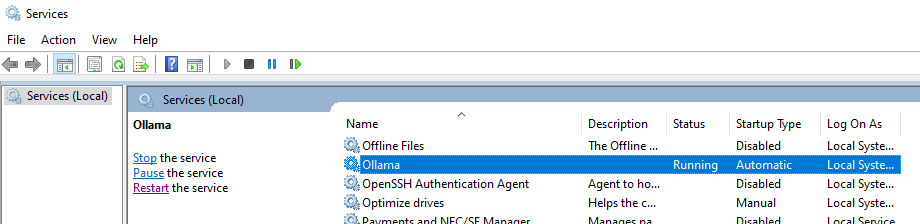
Confirm Ollama is running by opening your web browser and going to
http://localhost:11434If Ollama is running, you will see
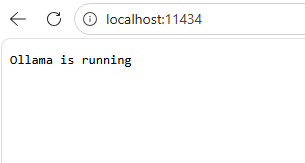
The Ollama service will start automatically with the computer without requiring a sign-in
Bind to 0.0.0.0 for external server access
To allow Shinydocs Pro to connect to Ollama:
Press Win + S, search for Environment Variables, and open the system settings
Under System Variables, click New
Variable name:
OLLAMA_HOSTVariable value:
0.0.0.0
Click OK on all dialogs to apply
Restart the Ollama app
Ollama will now listen on all interfaces, allowing Shinydocs Pro to connect using your machine's IP address on port 11434.
Firewall
Unsure your firewall (Windows Firewall or others) has an inbound rule allowing port 11434 (Ollama’s default port) for the computer Ollama is installed on.
IPv6
In some environments with IPv6-enabled network interface cards (NICs), connection issues may occur when accessing Ollama from outside the installed machine. If you have followed the steps above, including the firewall rule, and still cannot connect remotely, try disabling IPv6 in your network settings.
Increase default context window
Press Win + S, search for Environment Variables, and open the system settings
Under System Variables, click New
Variable name:
OLLAMA_CONTEXT_LENGTHVariable value:
10240
Click OK on all dialogs to apply
Restart the Ollama app
Linux
Install Ollama
Visit Download Ollama on Linux for the latest version
Start the Ollama service:
sudo systemctl start ollamaEnable on boot:
sudo systemctl enable ollamaTest it:
ollama run llama3
Bind to 0.0.0.0 for external server access
To allow network access for Shinydocs Pro:
Run:
sudo systemctl edit ollama.serviceAdd the following lines:
[Service] Environment="OLLAMA_HOST=0.0.0.0"Save and close
Reload the systemd daemon and restart Ollama:
sudo systemctl daemon-reload sudo systemctl restart ollama
Now Ollama will bind to all interfaces.
Increase default context window
Run:
sudo systemctl edit ollama.serviceAdd the following lines:
[Service] Environment="OLLAMA_CONTEXT_LENGTH=10240"Save and close
Reload the systemd daemon and restart Ollama:
sudo systemctl daemon-reload sudo systemctl restart ollama
Pull some models for use in Shinydocs Pro
We highly recommend using nomic-embed-text as your embedding model. You can pull this from Ollama by running the following command:
ollama pull nomic-embed-text:latest
Ollama supported models for different use cases
You will need to make sure the model you download will fit into your GPU’s VRAM.
Feel free to explore Ollama’s models and how they might fit your use cases: Ollama Models