
This guide walks you through securing and configuring access to two components of Shinydocs Pro:
Shinydocs Search Engine (powered by OpenSearch) - the backend search and analytics engine that indexes and queries your organization's content.
Shinydocs Dashboards (powered by OpenSearch Dashboards) - the web-based interface where users view search results, dashboards, and reports.
Shinydocs Search Engine and Shinydocs Dashboards are branded versions of OpenSearch. OpenSearch is a well respected and document platform, most of this guide comes from the existing documentation from OpenSearch: OpenID Connect - OpenSearch Documentation
By the end of this guide, you will have:
Replaced the default demo certificates with certificates issued by your organization.
Enabled HTTPS on both the search engine and dashboards.
Configured DNS so users can reach the dashboards at a friendly, trusted hostname.
Set up single sign-on (SSO) using OpenID Connect with Microsoft Entra ID, so users log in with their existing corporate credentials.
Created role-based access controls that determine what each group of users can see and do.
Connected the Shinydocs Pro Control Center to the secured services using a dedicated service account.
How Authentication Works in This Setup
Once configured, two separate authentication paths will coexist:
Interactive users (people using a browser to access Dashboards) authenticate via OpenID Connect. They click an SSO button, sign in through Microsoft Entra ID, and are redirected back to Dashboards with their identity and roles attached.
Backend services (Shinydocs Pro itself, and the internal Dashboards server process) authenticate using a traditional username and password over HTTPS. This is called basic authentication. These service accounts are defined locally inside OpenSearch and never go through Entra ID.
Both paths are active at the same time. The search engine evaluates them in order: if a request includes basic auth credentials, it uses those; if not, it hands off to the OIDC flow. This means enabling SSO does not break Shinydocs Pro's ability to read and write data.
Plan Your Access Model
Before configuring single sign-on, decide which groups of people need access and what they should be allowed to do. This is the most important planning step, and it is much easier to get right before you start editing configuration files.
How Roles Work
The access model has three layers:
Entra ID App Roles - defined in your Azure App Registration. These are the labels your identity team assigns to users or groups (e.g., "os_admin", "os_hr_viewer"). They travel inside the authentication token when a user signs in.
OpenSearch backend roles - the search engine receives the App Role values from the token and treats them as backend roles.
OpenSearch security roles - permission sets that you define in roles.yml and map to backend roles in roles_mapping.yml. This is where you control exactly which indices each group can access and what actions they can perform.
In short: Entra ID roles flow into the token, the token carries them to the search engine, and the search engine maps them to permissions on specific indices.
App Roles vs. Group Claims
Entra ID can send either App Roles (preffered) or Group Claims in the authentication token. For this setup, App Roles are strongly recommended:
App Roles appear as clean string values in the token (e.g., "roles": ["os_admin"]). They are simple to map in OpenSearch.
Group Claims send Azure group object IDs (long GUIDs). They are harder to work with, and in large organizations with many group memberships, the token can exceed browser cookie size limits, causing login failures.
Important: Organizations where users belong to more than 150 Entra ID groups frequently encounter infinite login redirect loops caused by oversized tokens. App Roles avoid this entirely because only the roles assigned to the specific application are included in the token.
Understanding Index Names and Aliases
When you create a source in the Shinydocs Pro Control Center, the search engine stores its data in an index with a GUID-based name (e.g., a3f8c1d2-7b4e-4f9a-b6c1-8d2e3f4a5b6c). This name is not human-readable, so Shinydocs Pro also creates an alias based on the source name you entered in Shinydocs Pro Control Center.
For example, if you create a source called "Marketing Docs", the alias will be marketing-docs. If you create a source called "HR Policies", the alias will be hr-policies. When defining index-level permissions in OpenSearch roles, you use these aliases (or wildcard patterns that match them) to control access.
Recommended Roles
Most deployments need two categories of roles:
Cluster-level roles for administrators and broad-access analysts who need to see everything.
Index-scoped roles for teams that should only access specific sources. These are custom roles you define in roles.yml, using index aliases to control which data each team can see.
Important: Every user who accesses Dashboards also needs the opensearch_dashboards_user role. This is a UI-level role that grants access to the Dashboards interface itself. Without it, users authenticate successfully but see a blank page.
The following table shows a recommended starting set. The first three are standard; the index-scoped examples illustrate the pattern you would repeat for each team or source:
The italicized rows are examples. You would create one App Role and one custom OpenSearch role for each team or group of sources that needs isolated access. The pattern is always the same: define the role in roles.yml with the appropriate index alias patterns, map the App Role to it in roles_mapping.yml, and assign users to the App Role in Entra ID.
Dashboards Tenants (Multi-Tenancy)
In addition to controlling which indices a user can query, you may want to control which saved dashboards, visualizations, and saved searches each team can see. OpenSearch Dashboards supports this through tenants.
A tenant is an isolated workspace inside Dashboards. Saved objects (dashboards, visualizations, index patterns) created in one tenant are not visible in another. Every user has access to a Private tenant (visible only to them) and can be granted access to shared tenants.
There are two common patterns:
Pattern A: Global Tenant + Private Tenants
All users share a Global tenant where organization-wide dashboards are published (e.g., company-wide search, executive summaries). Each user also has their own Private tenant for personal saved searches and experimental visualizations. This is the simplest setup and works well when index-level permissions are the primary access control.
Pattern B: Team-Specific Tenants
Each team gets its own named tenant (e.g., hr-team, legal-team). Dashboards and visualizations created by the HR team are only visible in the HR tenant. This is useful when teams build department-specific dashboards that should not be visible to other teams, or when different teams need different index patterns configured.
To create named tenants, add them to opensearch-security\tenants.yml:
hr-team: reserved: false description: "HR department dashboards and saved searches" legal-team: reserved: false description: "Legal department dashboards and saved searches" Then grant tenant access in your custom roles. The tenant_permissions block controls which tenants a role can read from or write to.
Note: Tenants control visibility of saved Dashboards objects (dashboards, visualizations, index patterns). They do not control which index data a user can query. Index-level access is controlled by the index_permissions block in the role definition. You typically use both together: index permissions to limit what data a team can search, and tenant permissions to isolate their saved dashboards.
Example: Mapping Entra ID Groups to Roles
A typical enterprise deployment creates Entra ID security groups and assigns them App Roles through the Enterprise Application. Here is an expanded example showing both cluster-level and index-scoped roles:
Prerequisites
Before starting, confirm that you have the following:
Shinydocs Pro installed and running, with the Search Engine and Dashboards operational (even if currently using HTTP and demo certificates).
Access to the server where the Search Engine and Dashboards are installed. The default installation path is C:\ProgramData\Shinydocs\SearchEngine\config for the Search Engine.
TLS certificates issued by your organization's certificate authority (CA).
Microsoft Entra ID permissions - Global Administrator or Application Administrator in your tenant.
A DNS record (or the ability to create one) that points a hostname to your Dashboards server.
Network connectivity between the OpenSearch server and
login.microsoftonline.comon port443.
Step 1 - Prepare your TLS Certificates
Shinydocs Pro ships with demo certificates for convenience during initial setup. These are not suitable for production use. Before enabling HTTPS, you need to replace them with certificates issued by your organization's internal certificate authority (CA) or a trusted public CA.
What Ships With Shinydocs Pro
The default config directory (C:\ProgramData\Shinydocs\SearchEngine\config) contains the following certificate files:
config\ admin.pem # Admin client certificate admin-key.pem # Admin client private key localhost.pem # Demo server certificate (CN=localhost) localhost-key.pem # Demo server private key root-ca.pem # Demo root CA certificate opensearch.yml opensearch-security\ # Security plugin configuration files log4j2.properties ... Here is what the directory looks like on a default installation:
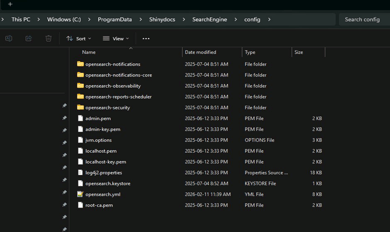
The demo certificates use CN=localhost and are signed by a demo CA. They will trigger browser warnings and are not trusted by other systems. You need to replace them.
What to Request From Your CA
Contact your organization's certificate team (or whoever manages your internal PKI) and request the following:
Search Engine Certificate (Internal Use)
The search engine is not exposed to end users directly. It is accessed by Shinydocs Pro and by the Dashboards server process, typically over localhost or an internal hostname. However, TLS is still required to encrypt traffic between components.
Subject / Common Name (CN): localhost or the internal hostname of the server (e.g., the machine's NetBIOS name or FQDN on the internal network).
Subject Alternative Names (SANs): Include localhost, 127.0.0.1, and the server's internal hostname or IP. This ensures connections from Shinydocs Pro (which typically connects via localhost) and from the Dashboards process both validate successfully.
Key usage: Server authentication (TLS Web Server Authentication).
Format: PEM-encoded. You need two files: the certificate file (.pem) and the private key file (-key.pem).
Certificate chain: The certificate file should contain the full chain: the server certificate first, followed by any intermediate CA certificates in order. The root CA certificate should be provided as a separate file.
Dashboards Certificate (User-Facing)
Dashboards is the component that end users access in their browsers, so its certificate must use the DNS hostname you will publish.
Subject / Common Name (CN): The hostname users will browse to (e.g.,
dashboards.corp.example.com).Subject Alternative Names (SANs): Include the DNS hostname and, if the Dashboards and Search Engine are on the same machine, localhost as well.
Key usage: Server authentication (TLS Web Server Authentication).
Format: PEM-encoded certificate and private key.
Certificate chain: Full chain, same as above.
Note: If the Search Engine and Dashboards run on the same server and your CA can issue a single certificate with SANs covering both localhost and the Dashboards DNS hostname, one certificate can be used for both services. Otherwise, request separate certificates.
Admin Certificate (for Security Administration)
Subject / CN: A distinguished name that identifies the admin client. The default Shinydocs configuration expects something like CN=os.admin,OU=Shinydocs Pro,O=Shinydocs Corporation,L=Kitchener,ST=Ontario,C=CA. You can use any DN, but it must match the admin_dn value in opensearch.yml.
Key usage: Client authentication.
Format: PEM-encoded certificate and private key.
Root CA Certificate
The root CA certificate (and any intermediates) that signed all of the above. This file is referenced as root-ca.pem in the configuration. If your CA chain has intermediates, bundle them into a single file with the root CA at the bottom.
Replace the Demo Certificates
Once you have your certificates:
Back up the existing demo certificate files in C:\ProgramData\Shinydocs\SearchEngine\config\ to a safe location.
Place your new certificate files in the same config directory, using filenames that make sense for your environment. For example:
config\ search-engine.pem # Search engine server certificate (full chain) search-engine-key.pem # Search engine server private key admin.pem # Your admin client certificate admin-key.pem # Your admin client private key root-ca.pem # Your root CA certificatePlace the Dashboards certificate and key in the Dashboards config directory (e.g.,
dashboards.pemanddashboards-key.pem), along with a copy ofroot-ca.pem.
Note: You can name the files anything you like, as long as you update the references in opensearch.yml and opensearch_dashboards.yml to match. The examples in this guide use descriptive names for clarity.
Configure DNS
Dashboards is the user-facing component that people access in their browsers. It needs a DNS hostname for two reasons:
TLS certificates validate against hostnames. If users browse to an IP address but the certificate's CN/SAN contains a hostname, the browser will show a certificate mismatch error.
Entra ID redirect URIs must use a hostname. Microsoft will not accept a bare IP address as a redirect URI for OIDC.
The search engine does not need a public or internal DNS record. It is accessed by Shinydocs Pro and the Dashboards server process over localhost or the machine's internal address, and those connections are covered by the SANs in the search engine certificate.
What to Create
Work with your DNS team to create an A record (or CNAME record, depending on your infrastructure) that points to the server hosting Dashboards:
Choose a hostname that aligns with your organization's naming conventions. The examples in this guide use dashboards.corp.example.com as a placeholder.
Verify DNS Resolution
Before proceeding, confirm that the record resolves correctly from a client workstation:
nslookup dashboards.corp.example.com It should return the expected IP address. If it does not, HTTPS and OIDC configuration will fail later.
Note: If your environment uses split-horizon DNS (different answers for internal vs. external queries), make sure the record resolves correctly from the networks where end users will be browsing from.
Step 2 - Enable HTTPS on the Search Engine
Open C:\ProgramData\Shinydocs\SearchEngine\config\opensearch.yml in a text editor. In its default state, the security plugin is disabled:
# disable the security plugin on opensearch. plugins.security.disabled: true To enable security, comment out (or remove) that line and uncomment the security block below it. Then update the certificate paths and the admin DN to match your new certificates.
Here is the complete security section with the changes highlighted:
# REMOVE or comment out this line: # plugins.security.disabled: true # Enable TLS for transport (node-to-node communication) plugins.security.ssl.transport.pemcert_filepath: search-engine.pem plugins.security.ssl.transport.pemkey_filepath: search-engine-key.pem plugins.security.ssl.transport.pemtrustedcas_filepath: root-ca.pem plugins.security.ssl.transport.enforce_hostname_verification: false # Enable TLS for HTTP (API and browser traffic) plugins.security.ssl.http.enabled: true plugins.security.ssl.http.pemcert_filepath: search-engine.pem plugins.security.ssl.http.pemkey_filepath: search-engine-key.pem plugins.security.ssl.http.pemtrustedcas_filepath: root-ca.pem plugins.security.ssl.http.enabled_protocols: - 'TLSv1.2' - 'TLSv1.3' # Do NOT use demo certificates in production plugins.security.allow_unsafe_democertificates: false # Allow the security plugin to initialize its index on first start plugins.security.allow_default_init_securityindex: true # Admin certificate DN (must match your admin certificate's Subject) plugins.security.authcz.admin_dn: - CN=os.admin,OU=Shinydocs Pro,O=Shinydocs Corporation,L=Kitchener,ST=Ontario,C=CA # Auditing plugins.security.audit.type: internal_opensearch plugins.security.audit.config.index: "'security-auditlog-'YYYY-MM" # Snapshot and REST API access plugins.security.enable_snapshot_restore_privilege: true plugins.security.check_snapshot_restore_write_privileges: true plugins.security.restapi.roles_enabled: ["all_access", "security_rest_api_access"] # System indices protection plugins.security.system_indices.enabled: true plugins.security.system_indices.indices: - ".plugins-ml-*" - ".opendistro-*" - ".opensearch-*" - ".ql-datasources" - ".replication-metadata-store" - ".opensearch-knn-models" Important: The admin_dn value must exactly match the Subject (Distinguished Name) of your admin certificate. If you are using a certificate with a different DN, update this value before starting the service. A mismatch will prevent you from running security administration commands.
Note: Certificate file paths in opensearch.yml are relative to the config directory. Since the certificate files sit directly in the config folder, you only need the filename (e.g., search-engine.pem), not a full path.
Restart the Search Engine service after saving. Verify it is running by opening a browser on the server itself and navigating to:
https://localhost:9200/ You should see a JSON response with the cluster name. If your certificate's SAN includes localhost (as recommended), this should connect without warnings.
Step 3 - Enable HTTPS on Dashboards
Open the Dashboards configuration file (opensearch_dashboards.yml located in C:\ProgramData\Shinydocs\Dashboards\config) and update it with your certificate paths and the HTTPS URL of the search engine. On Windows, use absolute paths with double backslashes.
# Point Dashboards to the secured search engine (accessed locally) opensearch.hosts: ["https://localhost:9200"] opensearch.username: "admin" opensearch.password: "

       " # Serve Dashboards on the standard HTTPS port server.port: 443 # Enable HTTPS for the Dashboards web UI server.ssl.enabled: true server.ssl.certificate: "C:\\ProgramData\\Shinydocs\\Dashboards\\config\\dashboards.pem" server.ssl.key: "C:\\ProgramData\\Shinydocs\\Dashboards\\config\\dashboards-key.pem" # Trust the CA that signed the search engine's certificate opensearch.ssl.certificateAuthorities: ["C:\\ProgramData\\Shinydocs\\Dashboards\\config\\root-ca.pem"] opensearch.ssl.verificationMode: certificate opensearch.requestHeadersWhitelist: [authorization, securitytenant] opensearch_security.multitenancy.enabled: true opensearch_security.multitenancy.tenants.preferred: ["Private", "Global"] opensearch_security.readonly_mode.roles: ["kibana_read_only"] opensearch_security.cookie.secure: true
If the Search Engine and Dashboards are on the same server, the Dashboards config can reference the same root-ca.pem file used by the Search Engine. Adjust the absolute paths accordingly.
A note on port 443: The default Dashboards port is 5601. Changing it to 443 (the standard HTTPS port) is recommended for production because users do not need to remember a port number, firewall rules are simpler, and the URL is cleaner. However, port 443 is a privileged port on some systems and may require the Dashboards service to run with elevated privileges. If your organization uses a reverse proxy (such as IIS Application Request Routing or an F5 load balancer) to terminate TLS in front of Dashboards, you can leave Dashboards on 5601 internally and expose port 443 through the proxy instead.
Restart the Dashboards service. Verify by browsing to:
https://dashboards.corp.example.com/ You should see the login page served over HTTPS. Since port 443 is the default for HTTPS, it does not need to appear in the URL.
Step 4 - Configure Microsoft Entra ID
Register the Application
Sign into the Azure Portal at https://portal.azure.com .
Navigate to Microsoft Entra ID > App registrations > New registration.
Set the display name (e.g., Shinydocs Pro - Dashboards SSO).
Under Supported account types, select Accounts in this organizational directory only.
Set the Redirect URI to Web and enter:
https://dashboards.corp.example.com/auth/openid/login
Click Register.
Record Key Identifiers
From the App Registration Overview page, copy and save:
Application (client) ID - this is your client_id.
Directory (tenant) ID - used to construct the OIDC metadata URL:
https://login.microsoftonline.com/
Important: Always use your specific Tenant ID in this URL. Do not use the /organizations/ or /common/ variants, as those cause token validation failures.
Create a Client Secret
Go to Certificates & secrets > New client secret.
Enter a description (e.g., Shinydocs Dashboards OIDC) and choose an expiry.
Click Add. Copy the Value immediately - it is only shown once. This is your client_secret.
Create App Roles
Go to App roles > Create app role.
For each role, fill in:
Display name: e.g., os_admin
Allowed member types: Users/Groups
Value: e.g., os_admin (this exact string appears in the token and must match your OpenSearch role mappings)
Click Apply. Repeat for each role. At minimum, create:
os_admin,os_analyst,os_dashboards_user, and one role per team that needs index-scoped access (e.g.,os_hr_viewer,os_legal_viewer).
Configure API Permissions
Go to API permissions > Add a permission > Microsoft Graph > Delegated permissions.
Add:
openidemailprofile
Assign Users and Groups
Navigate to Enterprise applications (not App registrations) and find the application.
Go to Users and groups > Add user/group.
Select a security group and assign its App Role(s).
Repeat for each group.
Step 5 - Configure the Search Engine for OIDC
Edit C:\ProgramData\Shinydocs\SearchEngine\config\opensearch-security\config.yml. This file defines how the search engine authenticates incoming requests. You need two authentication domains: basic auth for service accounts and OIDC for interactive users.
_meta: type: "config" config_version: 2 config: dynamic: authc: basic_internal_auth_domain: description: "Basic auth for Shinydocs Pro and admin accounts" http_enabled: true transport_enabled: true order: 0 http_authenticator: type: basic challenge: false authentication_backend: type: intern openid_auth_domain: description: "Entra ID SSO for Dashboards users" http_enabled: true transport_enabled: true order: 1 http_authenticator: type: openid challenge: false config: subject_key: preferred_username roles_key: roles openid_connect_url: https://login.microsoftonline.com/

       /v2.0/.well-known/openid-configuration authentication_backend: type: noop
What each setting does:
order: 0on basic auth means it is checked first. If a request carries a username/password header (like requests from Shinydocs Pro), it is authenticated here. Browser requests without credentials fall through to OIDC.challenge: falseon the basic domain prevents the browser from showing a username/password popup that would block the SSO redirect.subject_key: preferred_usernameextracts the user's UPN (e.g., jane.doe@contoso.com) from the token as their OpenSearch identity.roles_key: rolestells OpenSearch to read the App Role values from the roles claim in the JWT.type: noopmeans the search engine does not look the user up in its internal database after OIDC validation. Everything comes from the token.
Configure Role Mappings
Edit opensearch-security\roles_mapping.yml to connect the Entra ID App Role values to OpenSearch security roles. This file maps backend roles (the App Role values from the token) to OpenSearch security roles (the permission sets you define in roles.yml).
# --- Cluster-level roles --- all_access: reserved: false backend_roles: - "os_admin" description: "Entra os_admin gets full cluster access" readall: reserved: false backend_roles: - "os_analyst" description: "Entra os_analyst gets read-only access to all indices" opensearch_dashboards_user: reserved: false backend_roles: - "os_admin" - "os_analyst" - "os_dashboards_user" - "os_hr_viewer" - "os_legal_viewer" description: "All SSO users need Dashboards UI access" # --- Index-scoped roles (one per team) --- shinydocs_hr: reserved: false backend_roles: - "os_hr_viewer" description: "HR team gets read access to HR source aliases" shinydocs_legal: reserved: false backend_roles: - "os_legal_viewer" description: "Legal team gets read access to legal source aliases" Note: The backend_roles values are case-sensitive and must exactly match the Value field of each App Role in Entra ID. When you add a new team, add their App Role value to the opensearch_dashboards_user mapping as well, or they will not be able to use the Dashboards UI.
Define Custom Roles in roles.yml
Add index-scoped roles to opensearch-security\roles.yml. Each custom role specifies which index aliases the team can access and what actions they can perform. Use the alias names from your Shinydocs Pro Control Center sources.
Example: HR viewer role
This role grants read-only access to all sources whose aliases start with hr- (e.g., hr-policies, hr-onboarding, hr-employee-docs):
shinydocs_hr: cluster_permissions: - "cluster_composite_ops_ro" index_permissions: - index_patterns: - "hr-*" allowed_actions: - "read" - "search" tenant_permissions: - tenant_patterns: - "hr-team" allowed_actions: - "kibana_all_write" Example: Legal viewer role
Same pattern, scoped to legal source aliases:
shinydocs_legal: cluster_permissions: - "cluster_composite_ops_ro" index_permissions: - index_patterns: - "legal-*" allowed_actions: - "read" - "search" tenant_permissions: - tenant_patterns: - "legal-team" allowed_actions: - "kibana_all_write" How to adapt this pattern for your environment:
Look at the source names in your Shinydocs Pro Control Center. If HR has sources named "HR Policies" and "HR Onboarding", their aliases will be hr-policies and hr-onboarding. A pattern of hr-* covers both.
If a team's sources do not share a common prefix, you can list multiple specific aliases instead of a wildcard:
-
index_permissions: - index_patterns: - "employee-handbook" - "benefits-guide" - "training-materials" allowed_actions: - "read" - "search" The
tenant_permissionsblock is optional. Include it if you are using team-specific tenants. Thekibana_all_writeaction allows users to create and edit saved dashboards and visualizations within that tenant.If you are using the Global + Private tenant pattern instead, omit the
tenant_permissionsblock entirely. Users will work in the Global tenant (for shared dashboards) and their Private tenant (for personal/team work).
-
Important: Index patterns in roles.yml match against both index names and aliases. Since Shinydocs Pro uses GUID-based index names with human-readable aliases, always use the alias names in your patterns. If you use the raw GUID index name, a reindex operation could change it and break your role.
Step 5.1 - Configure Tenants (if you are using them in your model)
If you are using team-specific tenants, add them to opensearch-security\tenants.yml:
hr-team: reserved: false description: "HR department workspace" legal-team: reserved: false description: "Legal department workspace" If you are using only the Global and Private tenants (Pattern A), youdo not need to modifytenants.yml.
Change the Default Admin Password
Before applying the security configuration, you must change the default password for the admin internal user. The default password ships with every Shinydocs Pro installation and is publicly known.
Open a command prompt and navigate to the security plugin's tools directory:
cd C:\ProgramData\Shinydocs\SearchEngine\plugins\opensearch-security\toolsRun the password hashing tool to generate a bcrypt hash of your new password:
hash.batWhen prompted, enter your new password. The tool will output a bcrypt hash string that looks something like:
$2y$12$88IFVl6IfIwCFh5aQYfOmuXVL9j2hz/GusQb35o.4sdTDAEMTOD.KCopy the hash. Open C:\ProgramData\Shinydocs\SearchEngine\config\opensearch-security\internal_users.yml and replace the existing hash for the admin user:
admin: hash: "$2y$12$" reserved: true backend_roles: - "admin" description: "Admin user" If you plan to create a dedicated service account for Shinydocs Pro (recommended), add it to the same file:
shinydocs-service: hash: "$2y$12$" reserved: false backend_roles: - "admin" description: "Service account for Shinydocs Pro"
Apply the Security Configuration
You must run this. Failure to do this step will result in an incomplete configuration. This must also be run when you change the built-in admin password.
Run the security admin tool to push the updated YAML files into the cluster. On Windows:
Important: This command replaces the entire security configuration in the cluster. Make sure you are applying a complete set of files (config.yml, roles.yml, roles_mapping.yml, internal_users.yml, action_groups.yml, tenants.yml). Missing files will reset those sections to defaults.
securityadmin.bat pushes changes automatically and immediately, a restart of Shinydocs Search Engine is NOT required.
Step 6 - Configure Dashboards for OIDC
Add the following OIDC settings to opensearch_dashboards.yml, below the HTTPS settings you configured previously:
# Enable both SSO and basic auth on the login page opensearch_security.auth.multiple_auth_enabled: true opensearch_security.auth.type: ["openid", "basicauth"] # OIDC provider settings (from your Entra ID App Registration) opensearch_security.openid.connect_url: "https://login.microsoftonline.com/

       /v2.0/.well-known/openid-configuration" opensearch_security.openid.client_id: "

        " opensearch_security.openid.client_secret: "

         " opensearch_security.openid.base_redirect_url: "https://dashboards.corp.example.com" opensearch_security.openid.scope: "openid profile email" # Cookie handling for large Entra ID tokens opensearch_security.openid.extra_storage.cookie_prefix: security_authentication_oidc opensearch_security.openid.extra_storage.additional_cookies: 5
Key settings:
multiple_auth_enabled: true shows both an SSO button and a username/password form on the login page.
base_redirect_url must exactly match the Redirect URI configured in Entra ID (including https, hostname, and port).
additional_cookies: 5 accommodates larger Entra ID tokens. Increase this if users experience login failures.
Restart the Dashboards service after saving.
Step 7 - Verify Everything Works
Test SSO Login
Open
https://dashboards.corp.example.comin a browser.You should see a login page with both a username/password form and an OpenID Connect login button.
Click the OIDC button. You should be redirected to the Microsoft Entra ID sign-in page.
Sign in with an account that has been assigned an App Role.
After authentication, Dashboards should load. Check your identity and roles under the Security menu.
Verify Role Mapping
Once logged in via SSO, confirm:
Username matches the user's UPN (e.g., jane.doe@contoso.com).
Backend roles lists the App Role values assigned to that user (e.g., os_analyst).
Mapped roles shows the corresponding OpenSearch roles (e.g., readall, opensearch_dashboards_user).
Test Basic Auth
On the same login page, use the username/password form to sign in as the admin internal user. This confirms that basic auth still works, which is essential for Shinydocs Pro's backend connection and for emergency access if Entra ID is unavailable.
Step 8 - Connect Shinydocs Pro to the Secured Services
Shinydocs Pro communicates with the search engine and dashboards as a backend service. It uses basic authentication (username and password) over HTTPS. It does not use OIDC. This is the intended design: the Pro application reads and writes index data programmatically, so it authenticates with a service account, not an interactive user.
After enabling HTTPS, you need to update the Shinydocs Pro Control Center to use the new HTTPS URLs and credentials.
Update Service URLs and Credentials
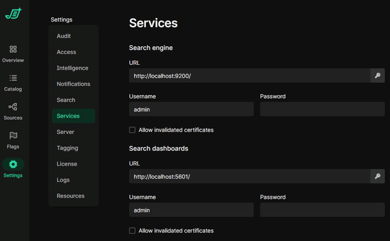
Open the Shinydocs Pro Control Center in your browser.
Navigate to Settings > Services.
Under Search engine:
Change the URL from http://localhost:9200/ to https://localhost:9200/. Since Shinydocs Pro connects to the search engine locally, localhost is the correct hostname here.
Enter the Username and Password for the internal service account (e.g., admin or a dedicated account you created in internal_users.yml).
If your certificates are signed by an internal CA that is not in the server's trusted root store, check Allow invalidated certificates. For certificates from a trusted CA, leave this unchecked.
Under Search dashboards:
Change the URL to https://dashboards.corp.example.com/.
Enter the same (or a separate) service account credentials.
Configure the certificate checkbox as above.
Save the settings.
Best Practices for the Service Account
Use a dedicated service account rather than the default admin user. Create a new internal user in internal_users.yml with a strong, randomly generated password and only the permissions Shinydocs Pro needs.
Rotate the password according to your organization's credential policy. When you rotate, update both internal_users.yml (then re-run securityadmin) and the Shinydocs Pro Control Center settings.
Do not use OIDC credentials for the Shinydocs Pro service connection. The Pro application is a backend service and must use basic auth.
Troubleshooting
This section covers common issues you may encounter while securing the Shinydocs Search Engine, Dashboards, and OIDC single sign-on. Issues are grouped by the stage of the setup where they typically appear.
General Diagnostic Steps
Before diving into specific symptoms, gather the following information. This will help you (or Shinydocs Support) resolve problems faster.
Enable Debug Logging for the Security Plugin
Add the following lines to the Search Engine's log4j2.properties file (located in the config directory alongside opensearch.yml), then restart the Shinydocs Search Engine service:
logger.securityjwt.name = com.amazon.dlic.auth.http.jwt
logger.securityjwt.level = trace
This produces detailed output in the Search Engine logs showing exactly how each incoming request is authenticated, which claims are extracted from tokens, and why authentication may be failing. Disable trace logging after troubleshooting, as it generates a large volume of log data.
Where to Find Logs
Search Engine logs: C:\ProgramData\Shinydocs\SearchEngine\logs\
Dashboards logs: Check the Dashboards service console output or the logs directory in your Dashboards installation folder.
Control Center logs: Available in Settings > Logs within the Control Center UI, or download them using the download button for a support ticket.
Windows Event Viewer: Check the Application and System logs for service start/stop failures.
Decode the Entra ID Token
If SSO login completes but role mapping or identity is wrong, decode the token to inspect its claims. After signing in via OIDC, capture the token from browser developer tools (Network tab, look for the callback request) and paste it into https://jwt.ms to view the claims. Confirm that the "roles" claim contains the expected App Role values and that the "preferred_username" claim matches the expected user identity.
TLS and Certificate Issues
These issues typically appear during Step 1 (Prepare TLS Certificates) and Step 2 (Enable HTTPS on the Search Engine).
OIDC and Single Sign-On Issues
These issues relate to Steps 4 through 7 (Entra ID configuration, Search Engine OIDC config, Dashboards OIDC config, and verification).
Role Mapping and Access Issues
These issues appear after OIDC is working but users cannot see the expected data or UI elements.
Shinydocs Pro Control Center Connection Issues
These issues appear when connecting the Shinydocs Pro Control Center to the secured Search Engine and Dashboards (Step 8).
DNS Issues
Still Stuck?
If you have worked through the relevant sections above and the issue persists:
Collect the Search Engine logs (with trace-level security logging enabled), Dashboards logs, and Control Center logs.
If the issue involves OIDC, capture a decoded copy of the Entra ID token (redact any sensitive values).
Submit a support ticket at https://shinydocs.atlassian.net/servicedesk/customer/portal/1 with the above information attached.
For issues specific to OpenSearch security configuration (not related to Shinydocs Pro itself), the OpenSearch documentation provides additional troubleshooting guidance at https://docs.opensearch.org/latest/troubleshoot/openid-connect/ .